
Ever installed an LED light only to find it doesn’t turn on — even though everything seems right? That’s often a polarity issue. Unlike regular bulbs, LEDs are diodes that allow current to flow in only one direction. Understanding LED polarity isn’t just for engineers; it helps homeowners, car owners, and DIYers avoid frustration and wiring mistakes.
In this guide, I’ll break down how LED polarity works, how to test it, what happens if you get it wrong, and easy ways to fix polarity problems with LED lights and strips.

What Is the Polarity of an LED?
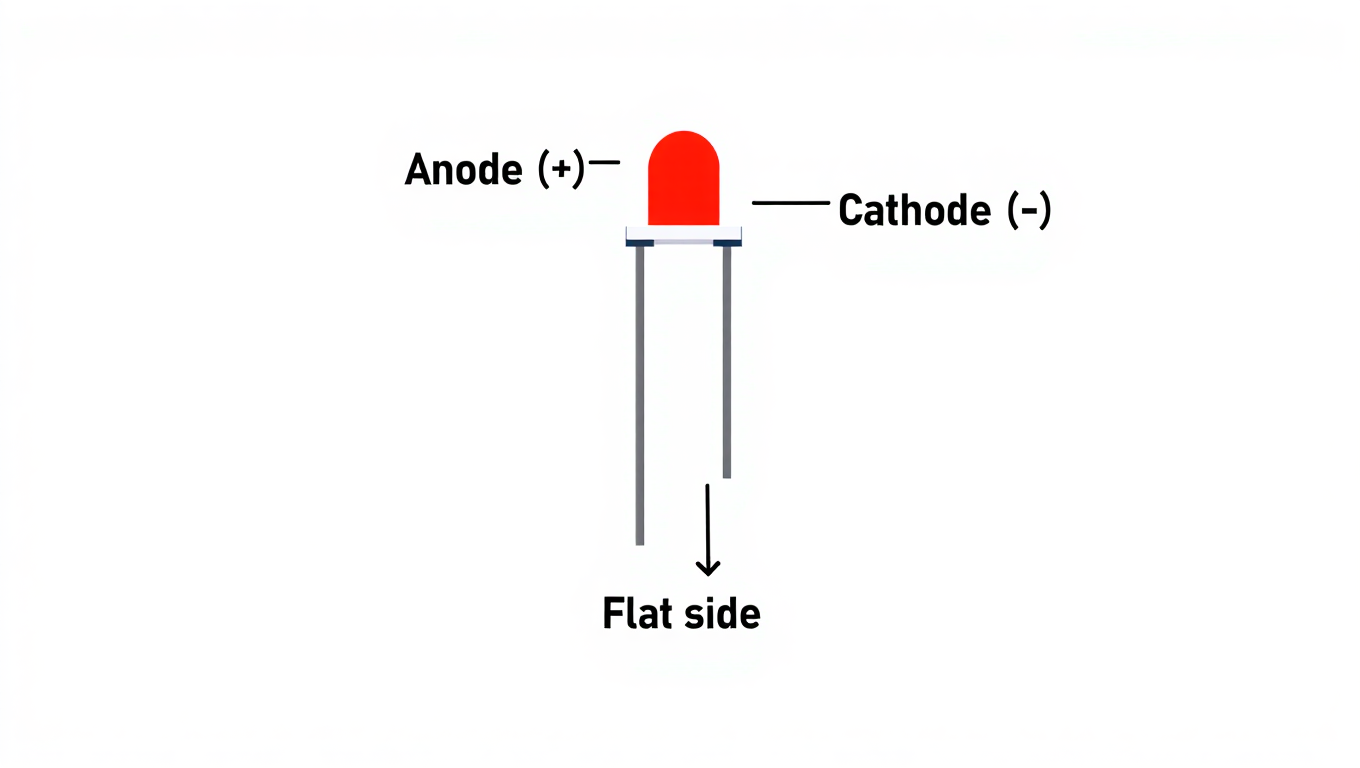
LED stands for Light Emitting Diode, and like all diodes, it has polarity. This means it has a positive terminal (anode) and a negative terminal (cathode). Current flows from the anode to the cathode — never the other way around.
When you reverse polarity, current cannot pass, and the LED won’t light up. This is why connecting the correct terminals is crucial whether you’re wiring LED headlights, strip lights, or small indicator bulbs on a circuit board.
Common identifiers:
- Anode (+) connects to the power source.
- Cathode (–) connects to ground.
How Does the Polarity of LED Light Work?
Inside an LED, electricity flows through a semiconductor junction. When electrons move from the negatively charged region to the positively charged region, they release energy in the form of light.
If polarity is reversed:
- No current flows.
- No light is emitted.
- In some cases, reverse voltage can permanently damage the LED.
For most low-voltage LEDs (like 5V or 12V strips), the risk is minimal. But in high-power automotive or industrial LEDs, reverse connection can blow the diode instantly.
Why LED Polarity Differs from Regular Diodes?
Regular diodes simply control current flow; LEDs add a light-emitting layer. While both have polarity, LEDs are more sensitive to incorrect wiring because of their fragile semiconductor structure and the heat generated during current flow.
Main differences:
- LEDs emit light when forward biased.
- Regular diodes only conduct.
- Reverse biasing LEDs can cause degradation over time, even if they survive the first connection.
This is why many modern LED drivers and car LED bulbs come with reverse-polarity protection circuits.
Is Polarity Important for LEDs?
Yes — polarity is essential. If you reverse the polarity, the LED may not light up or could be permanently damaged. However, some advanced LED modules now feature bridge rectifiers that allow them to operate regardless of connection direction.
Still, for basic LEDs and strips:
- Always connect positive to positive and negative to negative.
- Double-check before powering up, especially in vehicles or custom light setups.
How to Detect the Polarity of the LED?
There are several ways to identify which side is positive or negative. Here are five simple methods anyone can use — from hobbyists to electricians.
Method 1: Check Leads’ Length
In most through-hole LEDs:
- Longer lead = Positive (Anode)
- Shorter lead = Negative (Cathode)
This method is reliable for new LEDs straight from the package but may not work if leads are trimmed during installation.
Method 2: Look for Flat Edge & Round Side
Examine the LED body. The flat edge near the base indicates the negative side. The round side represents the positive terminal. This visual cue works well for small indicator LEDs and panel lights.
Method 3: Detect the Difference in the Plate
If you look closely inside the LED:
- The larger internal plate is the cathode (negative).
- The smaller plate is the anode (positive).
This method works even if leads are cut short or covered in solder.
Method 4: Use a Multimeter
Set your multimeter to the diode test mode:
- Connect the red probe to one lead, black to the other.
- If the LED glows faintly, red is positive and black is negative.
- If it doesn’t glow, reverse the probes.
This is one of the most accurate ways to verify polarity.
Method 5: Use a Coin Cell Battery
Place the LED leads across a 3V coin cell battery:
- Positive side of the battery → Anode
- Negative side → Cathode
If it lights up, polarity is correct. This method is ideal for quick testing in the field.
How To Identify The Polarity Of LED Strip Light?
LED strip lights are a bit different from single LEDs but still follow the same polarity rules.
- The strip will have printed markings: usually “+12V” or “+24V” and “–” (ground).
- Each segment on the strip repeats the same polarity marks.
- The positive line usually runs continuously along one side.
For RGB or RGBW strips:
- One shared positive line (often +12V)
- Separate negative lines for each color channel (R, G, B, W)
Incorrect polarity may prevent the strip from lighting or cause partial color failure.
Common LED Packages and Their Polarity Markings
Different LED designs have different polarity markings. Here’s how to read them:
Through-hole LEDs
- Long leg = positive
- Flat edge = negative
- Common in DIY circuits and indicator lamps.
Surface-mount LEDs (SMD)
- Cathode marked by a notch or small line on the corner.
- Polarity often printed on the PCB silk screen.
- Used in LED strips and modern light fixtures.
Special LED packages (COB, high-power)
- Usually have “+” and “–” printed directly on the module.
- Always verify with the datasheet before connecting.
Real-world Implications of LED Polarity
Understanding polarity helps prevent costly damage and ensures performance consistency.
The Electronics Landscape
Technicians often test polarity during PCB assembly to avoid misplacement errors. A reversed LED can cause failure in an entire lighting circuit.
On the Road: LEDs in Vehicles
In automotive applications, wrong polarity is one of the most common reasons LED headlights, indicators, or dashboard lights fail to illuminate. Some aftermarket bulbs include built-in rectifiers, but OEM LEDs are usually polarity-sensitive.
Troubleshooting Common LED Strip Polarity Issues
Before assuming your LED light or strip is defective, check for polarity-related issues. Many LED problems stem from reversed connections or unclear markings.
Difficulty In Finding the Polarity Mark
Sometimes the “+” or “–” symbols wear off or are hidden under silicone coatings. Use a multimeter or trace the copper pads on the strip — the wider trace is usually positive.
Wrong Polarity: Light Not Glowing
If your LED doesn’t light at all after connection, it’s likely wired backward. Fortunately, most low-voltage LEDs are safe after reversing. Just disconnect power and swap the wires — never reverse them while powered.
Loose Connection Causing Flickering
Flickering can also mimic polarity problems. Check for:
- Loose connectors
- Poor solder joints
- Bent LED pins
Reinforce connections or use secure clip connectors to restore steady illumination.
Wiring Compatibility Issues
Mixing different brands of LED strips and power supplies often leads to polarity confusion. Always match connectors and double-check the power adapter’s output polarity before turning it on.
What Happens If You Wire LED Lights Backwards?
Polarity mistakes are common, especially for beginners. Here’s what happens when LEDs are wired incorrectly.
1. No Light Emission
When connected backward, LEDs block current. The circuit is open, and no light appears. This is the most harmless outcome.
2. Potential Damage
Some LEDs — especially high-power ones — can’t handle reverse voltage. Their semiconductor junction burns out, permanently damaging the diode.
3. Overheating
In rare cases, reversed wiring may cause internal heating, especially if the LED has no built-in protection circuit.
4. Short Circuit Risk
Incorrect polarity can cause current to bypass normal paths, shorting out the driver or power supply.
5. Unstable Lighting
If partially connected or reversed in a mixed circuit, some LEDs may flicker, glow dimly, or show uneven brightness.
To avoid this, always test with a small power source first, like a 9V battery, before connecting to the main power supply.
Real-world Scenarios: LED Polarity in Action
Let’s look at how polarity plays out in practical environments.
- Home Lighting
Plug-and-play bulbs usually handle polarity automatically. But when wiring LED strips under cabinets or stairs, reverse connections are a frequent error.
- Automotive Lighting
Car LED bulbs, like turn signals and interior lights, are polarity-sensitive. If they don’t light up, flipping the connector 180° often fixes the issue.
- Industrial and PCB Lighting
Technicians use schematics to ensure correct polarity, as one reversed LED can disrupt a chain of lights on a board.
How to Fix a Reversed LED?
If you realize your LED was wired backward, here’s what to do:
- Disconnect Power Immediately to prevent damage.
- Check for Burn Marks on the LED or board. If it’s discolored or cracked, replace it.
- Rewire Correctly following polarity markings or using a multimeter.
- Add a Diode or Polarity Protection Module for sensitive circuits.
For LED strips, simply reverse the connector if it’s plug-based. For soldered setups, desolder and reconnect wires correctly.
Conclusion
LED polarity might sound technical, but it’s actually simple once you understand the basics. Every LED has a positive and negative side, and connecting them correctly ensures bright, long-lasting light. Whether you’re installing headlights, under-cabinet lighting, or decorative strips, always double-check the markings or use a multimeter before powering on. Proper polarity not only prevents damage but also guarantees consistent, efficient lighting performance.
If you’re shopping for reliable, clearly marked LEDs or polarity-protected LED strips, visit our website for high-quality, tested lighting solutions that make installation foolproof and frustration-free.
FAQs
Q1: Does polarity have an effect on LED light power consumption?
A: No. When connected correctly, polarity doesn’t affect power use. However, reversed polarity blocks current, causing the LED to consume no power and emit no light.
Q2: How do you identify the positive and negative terminal of an LED?
A: Look for a longer leg (positive), flat edge (negative), or smaller internal plate (positive). For LED strips, the printed “+” or “–” on the circuit shows polarity.
Q3: How do you check polarity without a multimeter?
A: Use a 3V coin cell battery. Connect one lead to each side; if the LED lights up, polarity is correct. If not, flip the connection.
Q4: Do surface-mount LEDs have polarity?
A: Yes. SMD LEDs have a small notch, arrow, or “T” mark showing the cathode side. Always check the datasheet or PCB markings before soldering.
Q5: How do I fix a reversed LED?
A: Disconnect power, flip the connector, or re-solder the LED leads correctly. If it still doesn’t light, the diode may be damaged and require replacement.