
LED Neon Flex lights have become a game-changer for both residential and commercial lighting projects. They combine the classic glow of neon with the flexibility, safety, and energy efficiency of modern LEDs. These lights are perfect for signage, accent lighting, garden projects, and architectural features. However, working with them correctly is crucial—improper cutting, soldering, or powering can cause damage, uneven illumination, or even shorten the lifespan of your installation.
This guide walks you through everything you need to know to handle LED Neon Flex lights safely and effectively. You’ll learn how to cut strips to custom lengths, solder connections securely, and power them reliably. With these tips, you can achieve professional-quality results for any creative lighting project.
What Are LED Neon Flex Lights?
LED Neon Flex lights are flexible circuits encased in silicone or PVC tubing, designed to replicate traditional neon lighting but with low-voltage LEDs. Unlike standard LED strips, Neon Flex provides a continuous, uniform glow without visible LED dots, making it ideal for signage, decorative accents, and architectural applications. The silicone or PVC casing not only protects the LEDs from moisture, dust, and UV light but also allows the strip to bend around curves, corners, and intricate designs.
Neon Flex lights are available in single-color options, RGB (color-changing), and addressable variants, allowing dynamic lighting effects. For example, an RGB Neon Flex strip can be programmed to cycle through colors or create animated patterns, making it perfect for holiday displays or custom commercial signage.
Key Features and Benefits
The major advantages of LED Neon Flex lights include flexibility, durability, and energy efficiency. Their bendable design allows them to wrap around corners and fit into tight spaces, enabling creative designs that traditional neon tubes cannot achieve. The protective casing ensures they withstand outdoor conditions, such as rain, sunlight, or dust.
Additionally, LED Neon Flex lights consume far less energy than traditional neon or incandescent lighting while generating minimal heat. High-quality strips can last between 25,000 and 50,000 hours, providing long-term value and low maintenance.
These features make Neon Flex ideal for both professional installers and DIY enthusiasts who want a professional-looking result with minimal safety concerns. Whether used for signage, garden accents, or architectural features, the versatility of Neon Flex is unmatched.
Voltage and Wattage Considerations
Most LED Neon Flex lights operate on either 12V or 24V DC. Selecting the correct voltage is critical because using a lower or higher voltage than specified can damage the LEDs or reduce their lifespan. The total power consumption depends on the length of the strip and the density of the LEDs.
Before powering the strips, it is essential to calculate the total wattage and choose a power supply capable of handling that load. Experts recommend adding a 20–30% safety buffer above the total wattage to prevent voltage drops, overheating, or premature failure.
For instance, a 10-meter 24V Neon Flex strip consuming 10 watts per meter would require a power supply rated at least 120 watts plus a safety margin—so a 150-watt power supply would be ideal.
Cutting LED Neon Flex Lights
Identifying Cut Points
LED Neon Flex strips have designated cut points marked along the strip. These marks indicate where it is safe to cut without damaging the internal circuitry. Cutting outside these points can destroy LED connections and render the strip unusable.
Tools Needed for Cutting
Before starting, gather the right tools to ensure a clean cut: a pair of sharp scissors or precision wire cutters, a measuring tape or ruler, and optionally, a marker to highlight the cut points. Using improper tools or guessing where to cut can result in wasted material and a failed installation.
Step-by-Step Cutting Process
First, measure the required length carefully and locate the nearest marked cut point on the strip. Cut precisely along this mark to avoid damaging internal wires or LED pads. After cutting, check the polarity of the strip, as this will be important when soldering and connecting the wires to a power supply. A good practice is to cut slightly longer than your planned measurement to allow for soldering space or adjustments.
Soldering LED Neon Flex Lights
Tools and Materials
Soldering LED Neon Flex lights requires a few essential tools and materials: a soldering iron and solder wire, heat shrink tubing or silicone connectors for waterproofing, and a multimeter to check continuity. For added convenience, a third-hand tool can hold strips steady during soldering.
Preparing the Strip for Soldering
Before soldering, carefully expose the copper pads on the strip without damaging the silicone casing. The pads should be clean and dry; if necessary, use alcohol wipes to remove dirt or oils. Proper preparation ensures strong, reliable solder connections that will last through daily use and environmental exposure.
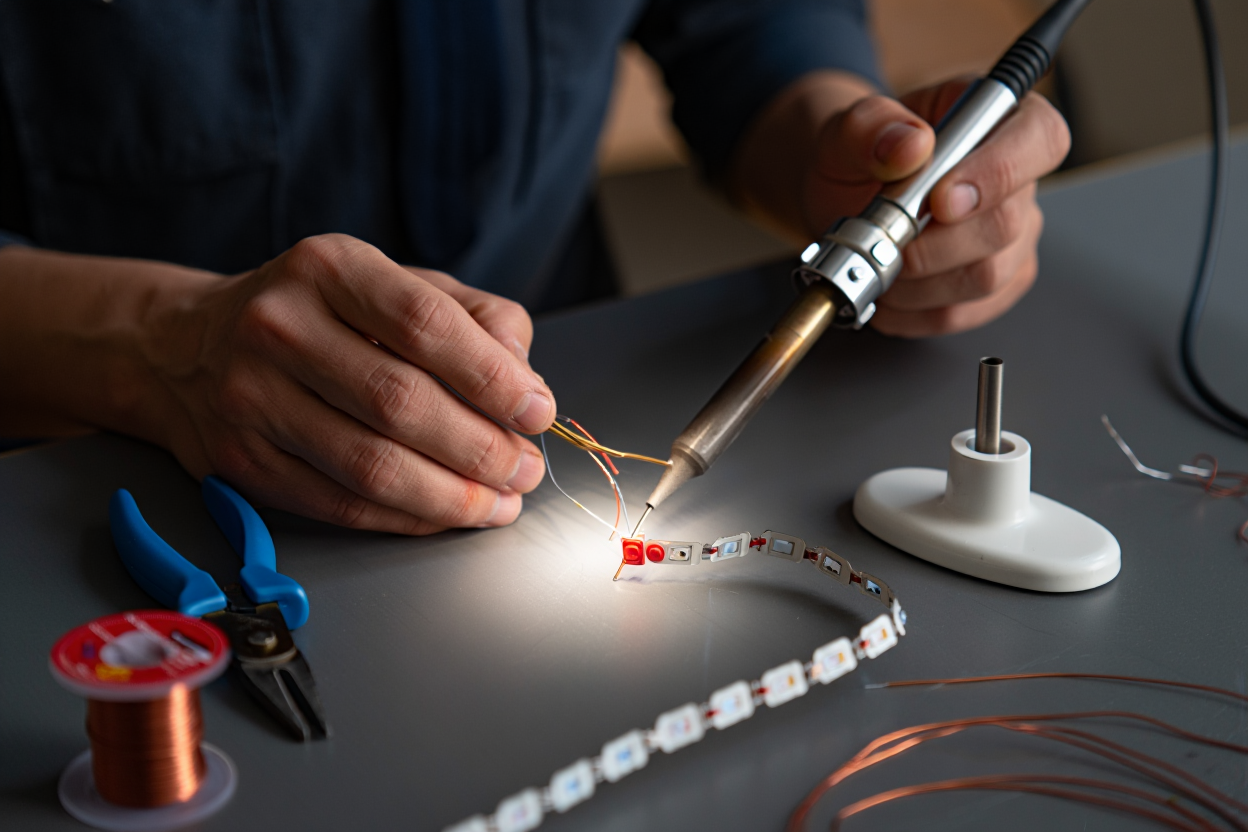
Step-by-Step Soldering Process
Begin by tinning both the soldering iron tip and the copper pads. Position the wires and solder them to the correct positive (+) and negative (–) pads. For RGB or addressable strips, ensure each color channel is correctly matched to its corresponding pad.
Once soldered, cover the joint with heat shrink tubing or silicone sealant to maintain waterproofing. Finally, use a multimeter to test the connection and confirm that the circuit is complete and properly connected.
Using too much solder or applying excessive heat can damage the LEDs or melt the silicone casing, so always work carefully and methodically.
Powering LED Neon Flex Lights
Choosing the Right Power Supply
Selecting the correct power supply is crucial for the performance and longevity of Neon Flex lights. Match the voltage of the power supply to the strip (12V or 24V) and ensure the wattage exceeds the total strip consumption by at least 20–30%. For outdoor installations, use waterproof or IP-rated power supplies to protect against rain and humidity.
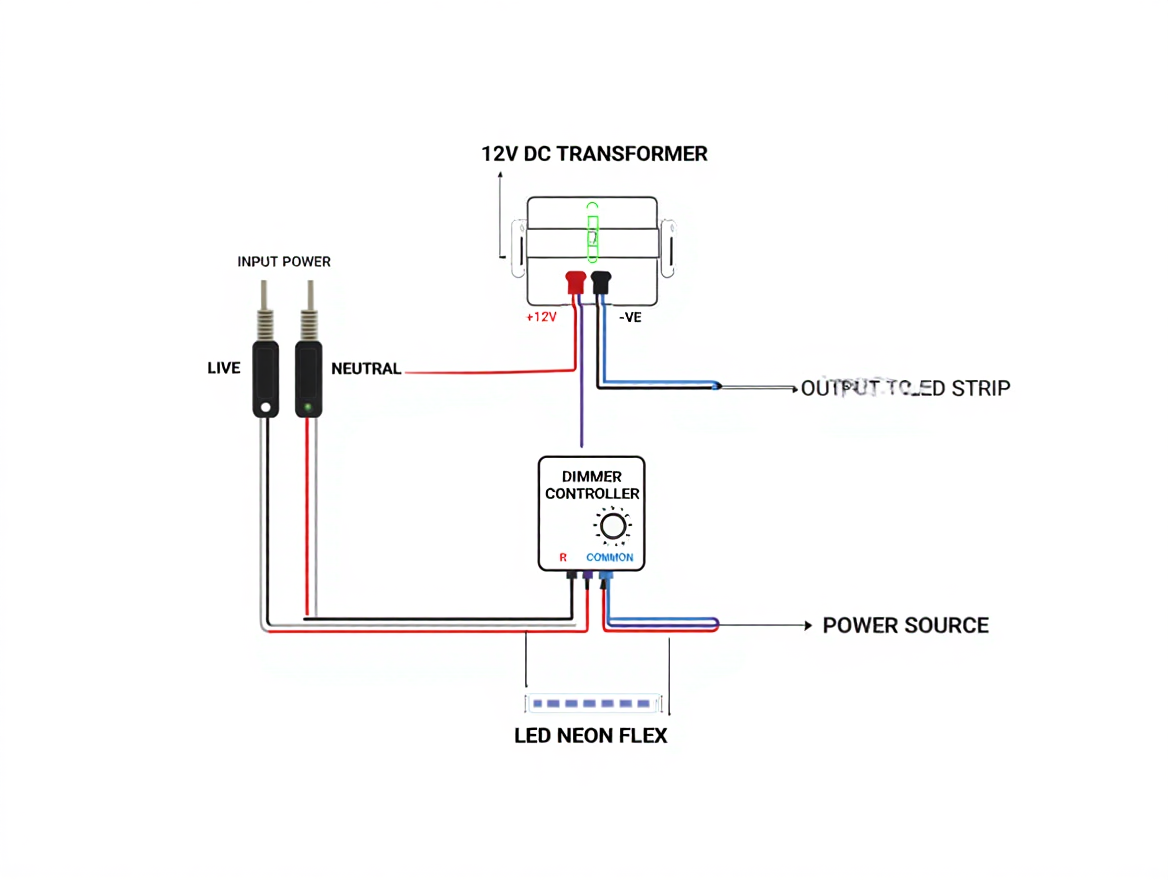
Connecting to the Power Supply
Before connecting the strip, confirm the polarity—positive wire to positive pad, negative to negative pad. For longer runs, provide multiple power feeds to prevent voltage drop, which can cause dimming at the far end of the strip. Connections can be made via soldering or waterproof connectors, depending on the setup and environmental exposure.
Safety Tips
Always disconnect the power supply before making any connections. Avoid overloading circuits, which can lead to overheating or failure.
For outdoor setups, ensure all joints and connections are waterproof using heat shrink tubing or silicone sealant. Proper preparation and waterproofing prevent short circuits and extend the life of your Neon Flex installation.
Troubleshooting Common LED Neon Flex Issues
Even with careful installation, LED Neon Flex lights can sometimes encounter problems. A common issue is when the strip does not light up at all, which usually indicates a problem with polarity, soldering, or the power supply. Checking connections with a multimeter can help identify whether the issue is a disconnected wire or a faulty segment.
Flickering lights are another common problem and often result from loose connections, insufficient power, or voltage drop across longer runs. Ensuring secure solder joints, using appropriately rated power supplies, and adding extra power feeds for long strips can resolve this issue.
Uneven brightness can occur if the voltage at the far end of a long strip drops too low. This can be fixed by distributing power across multiple points of the strip or by using thicker gauge wires to reduce resistance. Damage to the silicone casing, usually caused by excessive force or improper handling during cutting, soldering, or bending, can also lead to malfunction or short circuits. Regular inspection and careful handling prevent these problems.
Creative Applications of LED Neon Flex Lights
LED Neon Flex lights offer virtually limitless creative possibilities. One popular application is custom signage, whether for businesses, events, or home décor. Their flexibility allows letters, logos, or shapes to be formed easily, producing a smooth, continuous glow. RGB or addressable strips can add dynamic effects, like fading, chasing, or color transitions, to attract attention and enhance aesthetics.
Architectural accent lighting is another great use. Neon Flex can outline ceilings, staircases, and walls to create a modern ambiance. For outdoor projects, they can illuminate pathways, garden edges, or water features. The soft, even light enhances visibility while adding elegance and atmosphere. Unlike traditional lighting, these strips can bend around curves or corners, allowing highly customized layouts without harsh shadows.
In gardens or patios, Neon Flex lights can be installed under railings, along fences, or around planters to create subtle yet striking effects. Seasonal decorations benefit from RGB strips, as color patterns can change for holidays or special events. The durability and weather resistance of Neon Flex make these applications practical and long-lasting, combining both style and function.
Maintenance Tips for LED Neon Flex Lights
Proper maintenance ensures that LED Neon Flex lights remain bright and functional for years. Regular inspection of strips, solder joints, and connections can prevent small problems from turning into major failures. Look for loose wires, water intrusion, or discoloration that could indicate heat stress or electrical issues.
Cleaning the silicone casing with a soft, damp cloth removes dust, dirt, or pollen without damaging the LEDs. Avoid harsh chemicals, which can deteriorate the protective coating. For outdoor installations, trimming plants or branches near the strips prevents light blockage and potential damage.
For long-term reliability, consider integrating timers or smart controllers. Turning off lights during daylight hours saves energy and reduces wear on LEDs. Ensure that power supplies are in ventilated areas to prevent overheating, and inspect waterproofing on outdoor connections periodically. Following these maintenance steps extends the lifespan of the strips and maintains consistent illumination.
Conclusion
Successfully cutting, soldering, and powering LED Neon Flex lights allows you to create professional-quality, flexible lighting designs for a variety of indoor and outdoor applications. By following proper steps—measuring accurately, cutting at marked points, soldering carefully, and selecting an adequate power supply—you can avoid common pitfalls like flickering, uneven illumination, or damage.
Regular maintenance, including cleaning, inspection, and ensuring waterproof connections, keeps your installation reliable for years. Whether you are creating custom signage, accentuating architectural features, or illuminating outdoor spaces, LED Neon Flex lights offer vibrant, energy-efficient, and flexible solutions. With careful planning and execution, you can achieve stunning, long-lasting lighting results for any creative project.
FAQs
Can I cut LED Neon Flex anywhere?
No, you should only cut at designated cut points marked on the strip. Cutting elsewhere can damage the LEDs or internal circuitry, rendering the strip unusable. Always double-check measurements before cutting.
How do I connect multiple Neon Flex strips?
You can connect strips using soldering or waterproof connectors, ensuring correct polarity. For long runs, provide multiple power feeds to maintain brightness and prevent voltage drops.
Can I use a standard LED power supply?
Only if the voltage matches the strip’s specification (12V or 24V) and the power supply can handle the total wattage. Incorrect voltage can damage LEDs and reduce lifespan.
Do I need special tools to solder Neon Flex?
A basic soldering iron, solder wire, heat shrink tubing, and a multimeter are sufficient for most installations. For RGB or addressable strips, careful attention to polarity and channel matching is important.
How can I prevent flickering in long runs?
Use multiple power feeds along the strip and thicker gauge wires to reduce voltage drop. Ensuring secure solder joints and properly rated power supplies also helps prevent flickering.